Posts: 65
| Points: 95
| Last online: 04.21.2020
-
-
Just wanted to add another voice saying that we miss you and hope everything's OK! And that we LOVE Sasha-16!!
-
-
-
Every time I post a render to my Renderosity gallery that features a female character, that character is made with S16 -- and I always mention that in a "credits" section. Granted, it's not like loads of folks stop by my gallery, and I tend to post renders of clothed characters that don't really show off S16's amazing bends, but at least she's getting out there! It just may be hard to find her in a gallery that doesn't have tags for the figures you used.
I've also been putting together "head shots" for various female characters as I develop them and posting them on my blog, so rather than posting a render here I'll just give you a link to the Meet the Characters page. All the females are made with S16, which I acknowledge on a credits page.
For me, the most remarkable features of S16 aren't necessarily visible in renders. It's her "behind the scenes" ease of use and enhancements that make me such a fan, and those are harder to show other people, although I"m pretty sure a screenshot of S16's Easy Pose dials convinced at least one person to give her a try! I'd like to do more along those lines: giving others a peak into what makes S16 a joy to work with.
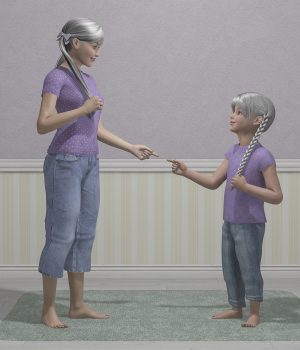
Edited to attempt embedding a render from the blog (of my main character and her younger self):
-
BTW, I ended up setting up my own S-16 "donor rig" and it works great. I imported the V4 DevSuit OBJ (that comes with V4) into Poser and used the Setup Room to rig it using my S16 base CR2.
I transferred only the bones I'd need for clothing and only the main Morphs++ FBMs, since I rarely use anything else to shape a body (other than S16's scaling and "true height" dials, which don't need to be copied into clothing).
Then I went through all the parameters panels on the newly rigged S16DevSuit and deleted all the stuff specific to the S16 figure and organized everything the way I'd want it to appear on any newly rigged clothing item. And then I saved that to the figures library as my "S16 Donor Rig."
I've used it quite a few times in the process of making a custom schoolgirl shirt and skirt as well as modifying some clothes made for other figures, and it works great!
I bring the "S16 Donor Rig" into my modeling app (Cheetah3D) and use it as the "tailor's dummy" to model around, and I've discovered something kinda interesting: clothing I make or modify this way and then rig using the S16 Donor Rig seems to fit S16 much better than clothes that were made for the standard V4, particularly in the area where the upper thighs meet the hips. I've made tons of "fix morphs" for that area in various pants and skirts I've bought, but I've never had to do that for an item I made or modified myself. Not sure why, but it kinda makes me want to try making even more things!
-
-
I just happened to look at your tutorial out of curiosity, since I already knew the basics of modifying existing morphs with the Morphing Tool, but I learned a few new things, so THANK YOU for the time and effort you put into making the tutorial!
You can also set whether your morph edits will impact other morphs on the "Combine" tab of the Morphing Tool palette. The "Combine" tab also has the option to "pin" vertices in place so that they won't be modified as you edit the morph.
I still prefer using my modeling app for making some kinds of morph targets, given the greater range of selection and modification tools, but the Morphing Tool within Poser is extremely useful!
-
-
After taking the time to fix many of these kinds of "spikes" (which I first learned how to do via EvilInnocence, so the problem actually pre-dates S-16), I finally realized that it's much easier and more effective to just use the "Copy Joint Zones from" (from the Figure menu), as it fixes all the problems with one click. It also helps shoes fit better.
However, as best I understand it, there's one type of clothing item that you shouldn't use this method on, and that's any item that passes between the legs (like pants or shorts). For those, use the "!!Copy S-16 Joint Centers to Clothes" file that Karina supplied in the TOOLBOX. (Actually, that's what I renamed the file to, and I also put it at the top of my Pose folder for easier access, but it's the "350" one you asked about.)
-
All my characters have heads scaled up by 5-10% (for a more stylized look), and it does drive me nuts when a character or pose file resets the head scale. (Haven't yet had it happen with an expression file, but I don't use those very often.)
But here's a fairly easy fix. Once you set up your character, "memorize" it (look under the Edit menu for the Memorize sub-menu). That will make the little dots disappear next to all the dials you used to set up the character, including the HeadSize dial.
Now, when you apply a Pose or Expression file, you can see if it changed any of your character's defaults because a little dot will appear to the left of the dial name. On a Mac, you can hold down Option and single-click on the dial to restore it to your "memorized" default.
Then, if you'd like, you can save a new version of the pose or expression to the library, this time using the drop-down menus to select which dials should be included (and thus excluding the HeadSize dial).
-
The only reason for making a morph injection pose file is if your character has some custom morphs, meaning you changed the figure's shape using either Poser's Morph Brush or an external modeler. That's why most morph injection pose files refer to a separate file usually stored in the Morphs folder of your Library, as that separate file has a record of all the deltas that were changed by the custom morph.
If the character is created only by adjusting the morphs already present in the figure (i.e., by "dial spinning"), then you can save the dial values by saving a preset to the Pose library. If you want to share that "dial spun" character with others, you just have to inform them which morph packages you used, such as Morphs++, Aiko4, Elite, or whatever. Then as long as the other person has a V4 set up with those same morph packages installed, the "dial spun" pose you shared will apply the same values to their figure. If you used any morphs only available in the S-16 version of V4, then you'd want to indicate that as well.
Technically, a "dial spun" character should not be considered an "INJ", b/c no new deltas are actually injected into the figure. They also shouldn't have "REM" files, but they might have "Restore" files that set all the parameter dials that were changed by the character back to their defaults.
I have a Numbers spreadsheet I use to record info on all of my character packages for V4 and M4 the first time I try them out, and one of the things I record is whether the character package injects new deltas (in which case one or more dials will appear under the Community section or elsewhere) or if it relies only on existing morph packages (and if so, which ones).
If it relies only on "dial spinning," I delete any "REM" files that might've come with it, as I've found that far too many of them will actually strip out the deltas for those morphs, leaving the figure with an incomplete set of Morphs++ or whatever dials. In those cases, using "Restore" works just fine.
Some characters make use of both custom morphs and "dial spinning," and in those cases I test out the "REM" file to make sure it only strips the deltas from the custom morph channels. If it does the same for any dials part of Morphs++, Aiko, or whatever, then I delete that REM file as well and just delete the custom morph manually (by clicking on the little triangle next to it and choosing "delete morph").
Hope that helps!
-
I'm pretty sure Karina did most, if not all, of the new custom morphs for S-16 using Poser's Morph Brush tool. You can increase the subdivision level on a figure in order to have more detail to work with, and set the Morph Brush to "bake down for subdivision," so that your changes still work when SubD is set to 0 (though with less detail, of course). That is by far the easiest way to morph a Poser figure b/c you don't have to worry about all the problems that get introduced with exporting and importing OBJs. No ZBrush needed!
To increase the subdivision level on S-16 (or any figure), first go to the Figure menu, select Skinning Method, and select Poser Unimesh. Now when you go the figure's properties panel, you'll see that the Subdivision Levels section is now functional, so you can use the sliders to set the level.
If you really want to make morphs in ZBrush, you'd do that for the S-16 version of V4 the same way you would on any other version of V4. So you can use Google to find tutorials on that process, since it's not specific to the S-16 version of V4 that Karina created.
Hope that helps!
-
Have you checked to see if maybe the character morph injection has set limits on the EyeSize dial? You can double click on the dial to see its minimum and maximum limits, and you can change them if needed..
Or maybe the injection changed the limits on the parameter dials controlled by the EyeSize dial, which are: rEye Scale (xyz), rEye zTranslate, lEye Scale (xyz), lEye zTranslate, and eyebrow:PHMEyeSize*. My guess is that the character injection did something to lock the Scale dials on each eye, but you should be able to change them back to their defaults (which are: Min Limits 10; Max Limits 1000000).
I don't have either of the character packages you mentioned, so I can't test them, but I do have others by Sabby, so if you come across the issue again, let me know and maybe I can help. You could also try contacting Sabby to ask what the morph injection does to the eyes.
* Here's how I found those: Click on the little triangle to the right of the dial, choose "Edit Dependencies," then click on the Keyed Dependencies tab. There you'll find a list of other parameter dials controlled by that dial.
-
When you first set up your character, you can apply the "100 Tongue Normal.pz2" file included in the TOOLS folder of KARINA'S TOOLBOX (which should be in your Pose library). Then memorize the figure and save it to the Figures library.
When you're ready to have the character "act" in a scene, load her from the Figures library. This version will have the tongue positioned like a "normal" tongue, and if your expressions ever change the tongue's position, you can always use "Restore" to get it back to the "normal" position. (Or you can just apply the "100 Tongue Normal" pose again.)
Hope that helps!
-
-
Zitat von Lost Alien im Beitrag #5
Hip Hip Hooray!
Poser is superb! - I especially love the favourites - I have organised thinks d=so I can find them as I need to - Superb!
I'm guessing you figured out how to solve the library's sorting issue on a Mac (by changing the 0 in LIB_ITEMS_SERVER_SORT 0 to a 1, in the Poser Prefs file), but apparently that doesn't fix the saved renders sorting. I have Poser save only the 10 most recent renders, so it's not a big issue for me, but I know it might be for others. As for using the Poser Library "Favorites" tab, here's why I don't use it: b/c the items saved there are hard-coded to a path on your computer, so if you ever change the names of any of the folders along that path, the Favorite preset will no longer work. It should come as no surprise, given my username, that I change things like folder names A LOT! I'm always refining how I organize my primary runtime library to suit the way I work, even to the point of storing a variety of file types in the same area. (For ex., I store all the lights, cams, and mats that come with a prop in that prop's folder in the Props library, and they all work just fine.) But since you're on a Mac, you might consider making use of Finder tags to further organize your runtime library. I've assigned "Poser Handy" tags to all the library folders I want easy access to, and every time I install new content, I tag the relevant files to indicate what the item is. For example, sofas. Or: menswear tops Or: hair-texture And so on. Then I can browse all those items just by selecting the tag in the Finder sidebar (our using a Finder search). I also use "Saved Searches" to quickly access things like items I've recently added to the Props or Materials library, or those pesky XMP files I don't need. And I also use custom folder icons within each Library folder to make it easy to spot the Library sub-folders that go with each major category of content (so V4, M4, and K4 each have their own folder color). I made the custom folder icons by opening a standard one in Preview and modifying the hue. One of these days I'll write a fuller description of the various ways I use Mac's Finder to organize all my Poser stuff to post on my blog, for anyone who's interested. But wanted to toss out a few things now, even though it's a bit off-topic for this thread! (It is, however, the reason why "improving Poser's library" will never appear on Poser wishlist for the new Renderosity owners!)
-
Thank you so much for preparing that file and sharing it! I will learn by studying it, which is basically the same way I learn most things (including web design in the early days, and Poser's material room).
I've never really studied injection pose files that do things like set up groups and channels, I guess b/c I didn't realize they use the same data found in a CR2, but now I know!
I can't use Poser File Editor b/c I'm on a Mac, but at least BBEdit for Mac has some features that make navigating long CR2s less tedious than it would be in a simple text editor.
Again, many thanks!
-
-
Zitat von Karina im Beitrag #9
Hello @Perpetualrevision:
I must look deeper into the issue, so have some patience with me please.
I'll see what I can do.
I With everything you did leading up to the release of the 2019, you must be exhausted! So there's nothing you need to "look deeper into" any time soon. Having a "dev rig" version of the S-16 CR2 would be handy, but it certainly isn't as much of a priority as making sure you have plenty of time to rest and recover from all your hard work! Sending you a virtual cool drink and a lounge chair by the pool :-)
-
I ended up copying all the groups and "empty" channels for CDI Faerime out of another CR2 and into my baseS-16 CR2, across all the relevant actors (head, neck, chest, eyeBrow, and eyes). But because I don't ever want to have to do that again, I'd love to take a look at your grouping pose file for the head just so I can see how you did it. I can then expand the concept to cover the other actors. If you can't share the grouping PZ2 here, you could use Pastebin and share the link or send it via sitemail on Renderosity. I'm PerpetualRevision there (and also on Gmail).
Thanks for the offer!
-
-
I can't see a way to delete the previous post, so I'm replying to it instead. After some more investigations, I've finally figured out how to get the CDI Faerime groups and channels into a copy of the S-16 Base Loader, so that everything is "prepared" to receive full or partial INJs from the CDI Faerime morph package.
The process was rather tedious, as it involved a lot of copying small chunks of groups and channels text from a "standard" V4's CR2 and pasting them into a copy of the S-16 base loader's CR2, across all the affected actors, while taking care not to disrupt the structure of the existing groups and channels. But it worked!
I'm still open to learning about better ways to do this, but I plowed ahead myself b/c I've been waiting on the S-16 2019 release in order to move forward on my graphic novel project, and now I have a lot of work to catch up on!
-
I've "reverse engineered" some things to figure out how the CDI Faerime channels and groups get applied to a standard V4 upon loading, and now I've identified all the _Chnnls.pz2, _ERC.pz2, and _Grps.pz2 files associated with Faerime (in the !DAZ folder).
So now I'm wondering if I can just compile those into a PZ2 file like this (with the appropriate version ID and opening and closing brackets, of course):
	readScript ":Runtime:libraries:!DAZ:Victoria 4:head:60-ps_mr599b_Chnnls.pz2"
	readScript ":Runtime:libraries:!DAZ:Victoria 4:head:60-ps_mr599b_Grps.pz2"
	readScript ":Runtime:libraries:!DAZ:Victoria 4:head:60-ps_mr599b_ERC.pz2"
	readScript ":Runtime:libraries:!DAZ:Victoria 4:neck:61-ps_mr599b_Chnnls.pz2"
	readScript ":Runtime:libraries:!DAZ:Victoria 4:neck:61-ps_mr599b_Grps.pz2"
	readScript ":Runtime:libraries:!DAZ:Victoria 4:neck:61-ps_mr599b_ERC.pz2"
	(and so on, for all relevant actors)
Would that be sufficient to make a PZ2 I could apply to my base S-16 in order to make her "ready to receive" the CDI Faerime deltas when I apply them via the INJ Faerime file? (By "ready to receive" I mean that all the dials would be organized the way they're supposed to be, not all jumbled together under the generic Morphs group.) If I'm on the right track but you feel this discussion has gotten too technical for the original topic of this thread, you can reply via private message here on the site, rather than via this thread!
-
-
I know why the Faerime dials load into S-16 all under the Morphs group, whereas in a standard V4 they load in neatly organized groups: because the standard V4's CR2 already has the "receiving" groups set up, ready to be populated by an INJ file. Those groups were set up when I ran the DzCreateExPFiles-V4 command after installing the Faerime package.
What I don't know is how to get those "receiving" groups set up for my S-16 base, since the S-16 setup CR2 doesn't seem to be reading whatever got set up via the DzCreateExPFiles-V4 command. And that's fine, since I like the way you organize the groups much better. But I was wondering what I could do to get the Faerime groups into my base S-16 so that I don't have to reorganize all those dials every time I inject the package!
BTW, for sharing snippets of code, you can use free web tools designed for just that purpose, for those posting to forums that have no "code" or "pre" markup. The oldest and most well known is Pastebin, but there are others. You just paste the code there, copy the link, and share the link on the forum post.
-
The method I use for transferring characters is pretty much the same as what Jim described, and it's relatively easy to do. So if setting up an "injection CR2" wouldn't simplify the process at all, then you definitely don't need to put your time into making one!
However, I would like to know how to set up a CR2 so that it's "ready" to receive a full INJ from a morph package that has lots of parts. You did that for most of the V4 morph packages people are likely to have, but not for one I use regularly, which is CDI Faerime. Unlike the CDI Morphia package, Faerime has only head morphs, and I like it b/c it dramatically widens my options for shaping characters' faces.
But when I inject the full CDI Faerime package into my S-16 starter, all the head morphs show up under the Morph group on the Head parameter panel, in no particular order. By comparison, when I load the package into a standard V4, the dials come in neatly organized into separate groups, all under a main group.
So basically I'd like to know how to "prepare" a S-16 CR2 to "receive" these Faerime dials in their intended groups, the way you did with other morph packages. I don't mind doing it myself; I just need some tips on what, exactly, to do!
-
Part of what prompted me to make the first post in this thread was that I wasn't sure if it was better to model clothing around the original V4 mesh or around an S-16 figure exported as an OBJ. Karina pointed out that they're the same, but I think that would only be true if you loaded S-16 and didn't apply any of the extra features included with her -- and in that case, why not just model around the original V4 mesh instead?
When I was trying to re-model a shirt, I first exported an OBJ of my base S-16 figure and brought that into my modeler. But later I decided to also load the original V4 OBJ just to make sure they're the same, and I discovered a few small differences, esp. in the upper chest/under arms area, where the S-16 export was fuller and wider than the original V4 mesh.
I'm guessing that when you export an S-16 mesh, you're getting the shape as it's been improved by Karina's weight mapping and other fixes that were applied via the CR2, rather than the shape as in the original OBJ (without the influence of a CR2). And if you're going to be copying S-16 joint zones into the clothing item once you've got it rigged and conformed on a character, then it seems like it would be better to use the original V4 OBJ as the "tailor's dummy" for clothing, so that you don't end up with a double-dose of the S-16 improvements.
At least, I'm pretty sure that's what was happening with a shirt that was giving me trouble, and the trouble went away when I switched to using the original V4 OBJ as the target base. Hope that makes sense!
|
|


![[b][/b]](http://img.homepagemodules.de/ds/static/gaia/bold.png "[b][/b] Insert")
![[i][/i]](http://img.homepagemodules.de/ds/static/gaia/italic.png "[i][/i] Insert")
![[u][/u]](http://img.homepagemodules.de/ds/static/gaia/underline.png "[u][/u] Insert")
![[code][/code]](http://img.homepagemodules.de/ds/static/gaia/code.png "[code][/code]")
![[quote][/quote]](http://img.homepagemodules.de/ds/static/gaia/quote.png "[quote][/quote] Insert")
![[spoiler][/spoiler]](http://img.homepagemodules.de/ds/static/gaia/spoiler_neu.png "[spoiler][/spoiler] Insert")
![[url][/url]](http://img.homepagemodules.de/ds/static/gaia/link.png "[url][/url]")
![[img][/img]](http://img.homepagemodules.de/ds/static/gaia/picture.png "[img][/img]")
![[video][/video]](http://img.homepagemodules.de/ds/static/gaia/movie.png "[video][/video]")


![[pre][/pre]](http://img.homepagemodules.de/ds/static/gaia/pre.png "[pre][/pre] Insert")
